WWDC 2012 and indie conferences


Of course the big news yesterday was Apple’s announcement of WWDC 2012 and then it’s subsequent record sellout in a little under 2 hours.  I was fortuitous enough to have the means and opportunity to secure a ticket for myself, but many developers were not.

Fortunately for those wishing to participate in the technical instruction and peer networking of an iOS/Mac tech conference, there are a number of excellent indie conferences.  These conferences have the benefits of being both more intimate (i.e. easier to network) and more affordable than WWDC while still having great technical content.  Two excellent American conferences are CocoaConf (at which I will be speaking in June), a roaming conference that occurs in various underserved (in the technical conference sense) cities, and 360iDev which has now settled in beautiful Denver, CO every September.  Scott McAlister has compiled a list of 2012 iOS tech conferences on his blog here.

So if you crave that conference fix but didn’t get a ticket to WWDC this year (or even if you did), don’t offer to legally change your name, just go attend one of the many outstanding indie conferences instead.

CocoaConf DC 2012

I am extremely pleased to announce that I will be speaking at CocoaConf DC (actually in Herndon, VA) at the end of June.  This time I will be giving two presentations: one on container view controllers and the other on matrix transformations.

There are a slew of expert speakers on the schedule, and I’m really looking forward to attending as well as speaking.  At CocoaConf Chicago last month I met a bunch of great developers, watched some excellent presentations, learned many things, and just generally renewed my enthusiasm for iOS development.  And the conference hotel is just a few miles from the Air & Space Museum where Discovery now resides.  So book now while early bird tickets at $200 off are still available!


Title: Implementing Custom Container View Controllers

Abstract: iOS 5 introduced the ability to create your own custom container view controllers. Prior to iOS 5 you had to use only the stock controllers (tab, navigation, splitview, etc.) or attempt to roll your own, which was a complex endeavor and often hacky. Custom container view controllers are a great way to give your app a unique look and feel. Learn how to implement your own custom container view controller using the new API. We’ll build a page-flipping controller and cover the various gotchas that can arise along the way. The final product will be an open-source controller that you are free to use in your own apps or just study and take apart.


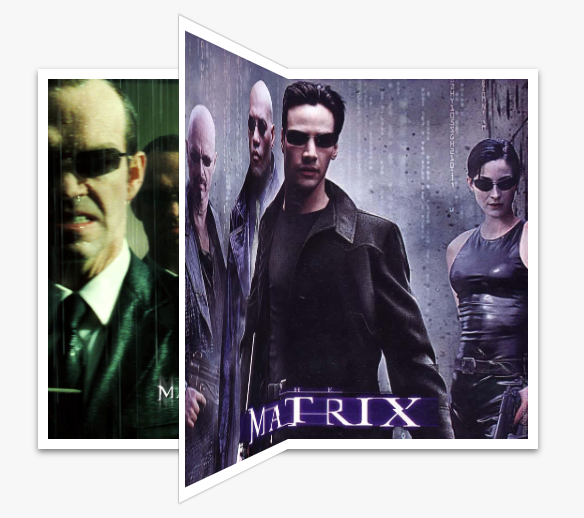
Title: Enter The Matrix

Abstract: Matrix transformations can make your user interfaces come to life: translate, scale, and rotate.  Each on its own is relatively simple and straightforward.  Yet many developers are daunted when 2 or more operations need to be combined.  What if you need to rotate or zoom about an off-center (or even off-screen) point?  How do you combine multiple transformations into a single animation?  How do you make advanced, polished 3D animations such as folding and flipping views?  Learn everything you need to know to get started with complex matrix transformations in CoreGraphics and CoreAnimation.  Tons of demos and full open-source source code provided.

On the importance of setting shadowPath

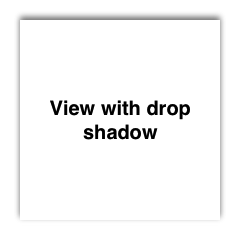
It’s super easy to add drop shadows to any view in iOS. All you need to do is

  1. add QuartzCore framework to your project (if not there already)
  2. import QuartzCore into your implementation file
  3. add a line such as [myView.layer setShadowOpacity:0.5]

and voilà, your view now has a drop shadow.


However, the easy way is rarely the best way in terms of performance.  If you have to animate this view (and especially if it’s part of a UITableViewCell) you will probably notice stutters in the animation.  This is because calculating the drop shadow for your view requires Core Animation to do an offscreen rendering pass to determine the exact shape of your view in order to figure out how to render its drop shadow.  (Remember, your view could be any complex shape, possibly even with holes in it.)

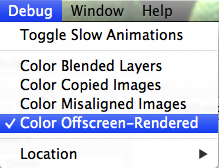
To convince yourself of this, turn on the Color Offscreen-Rendered option in the Simulator’s Debug menu.


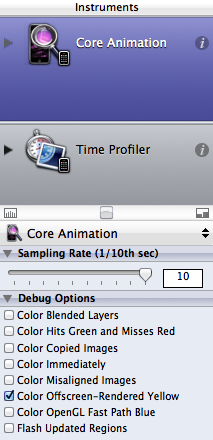
Alternately, target a physical device, launch Instruments (⌘I), choose the Core Animation template, select the Core Animation instrument, and check the Color Offscreen-Rendered Yellow option.


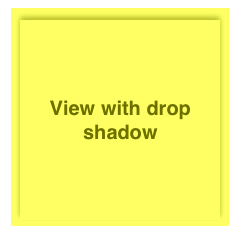
Then in the Simulator (or on your device) you will see something like this:


Which indicates that something (in our case the drop shadow) is forcing an expensive offscreen rendering pass.

The quick fix

Fortunately, fixing the drop shadow performance is typically almost as easy as adding a drop shadow.  All you need to do is provide Core Animation with some information about the shape of your view to help it along.  Calling setShadowPath: on your view’s layer does exactly that:

[myView.layer setShadowPath:[[UIBezierPath 
    bezierPathWithRect:myView.bounds] CGPath]];

(Note: your code will vary depending on the actual shape of your view.  UIBezierPath has many convenience methods, including bezierPathWithRoundedRect:cornerRadius: in case you’ve rounded the corners of your view.)

Now run it again and confirm that the yellow wash for offscreen-rendered content is gone.

The catch

You will need to update the layer’s shadowPath each time the bounds of your view change.  And if you’re animating a change to bounds, then you will also need to animate the change to the layer’s shadowPath to match.  This will need to be a CAAnimation because UIView cannot animate shadowPath (which is a property on CALayer).  Fortunately, it is straight-forward to animate from one CGPath to another (from the old to new shadowPath) via CAKeyframeAnimation.

On the importance of setting contentScaleFactor in CATiledLayer-backed views

If you look at any samples for CATiledLayer (such as ZoomingPDFViewer), you will invariably see code like this:

// to handle the interaction between CATiledLayer and high // resolution screens, we need to manually set the tiling view's // contentScaleFactor to 1.0. (If we omitted this, it would be 2.0 // on high resolution screens, which would cause the CATiledLayer // to ask us for tiles of the wrong scales.)
pdfView.contentScaleFactor = 1.0

Without this line, on retina devices such as iPhone 4/4S or the latest iPad, your view will probably ask for 4x as many tiles as are necessary.  (Note that retina screens have 4x as many pixels as their non-retina counterparts, so unless you are doubling the dimensions of CATiledLayer tileSize for retina, your view will already ask for 4x as many tiles as for non-retina, so in this case your retina view would ask for 16x as many tiles as its non-retina version.)

That’s all well and good.  The point I wanted to make in this post was simply a reminder that if you are doing any view juggling with your CATiledLayer-backed views (such as dequeueing them for reuse as pages in an infinite scroll view), you need to set contentScaleFactor each time you add your view to the view hierarchy.  Otherwise, it will take on the contentScaleFactor of its new superview and it will start asking for the wrong tile sizes.

Update: It’s not just view juggling. Any time your CATiledLayer-backed view or any view higher up in its view hierarchy is added to a parent view hierarchy, then contentScaleFactor of your view will reset to 2 on a retina device.  This includes switching tabs in a UITabBarController or pushing a new view controller onto the navigation stack of a UINavigationController.  The way I’ve handled this is by overriding viewWillAppear: in the UIViewController that contains the CATiledLayer-backed view.

Update 2: Aaron Farnham wrote me to suggest that you simply override didMoveToWindow in your CATiledLayer-backed UIView and call setContentScaleFactor:1 there.  Like so:

- (void)didMoveToWindow {
    self.contentScaleFactor = 1.0;
}

Efficient Edge Antialiasing

This trick is an oldie, but still worth writing about I think.  The problem is that when a view’s edges are not straight (e.g. the view has been rotated), the edges are not antialiased by default and appear jagged.
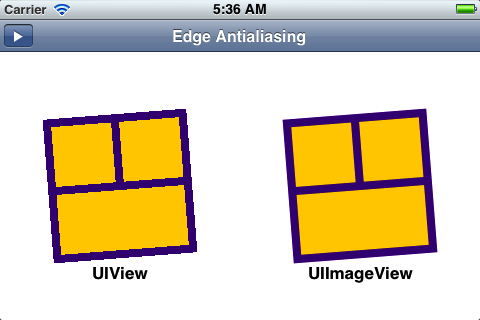
Non-antialiased view on left, anti-aliased view on right
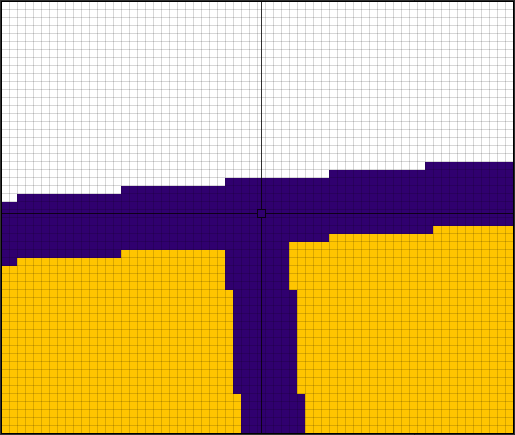
Detail of jagged non-antialiased edge


One Solution

Antialiasing is the process whereby a view’s edges are blended with the colors of the layer below it.  Antialiasing for view edges can be enabled systemwide by setting the UIViewEdgeAntialiasing flag in your app’s info.plist, but as the documentation warns, this can have a negative impact on performance (because it requires Core Animation to sample pixels from the render buffer beneath your layer in order to calculate the blending).

An Alternate Solution

If the view in question is static content (or can be rendered temporarily as static content during animation), then there is a more efficient alternative.  If you render the view as a UIImageView with a 1 point transparent boundary on all sides, then UIImageView will handle it for you (Core Animation will not have to sample the render buffer beneath your view layer).
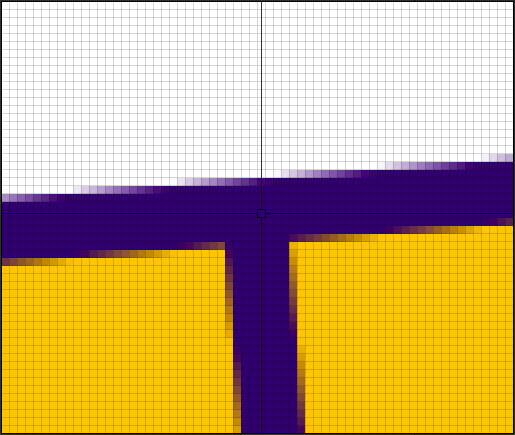
Detail of smooth antialiased edge


How It Works

UIImageView has been highly optimized by Apple to work with the GPU, and one of the things it does is interpolate pixels within the image when the image is rotated or scaled.  Examine the UIImageView below- the outer edge is jagged, but the inner boundaries between the yellow and purple are properly interpolated by UIImageView (compare it to the UIView on the left in the first image near the top of this article).
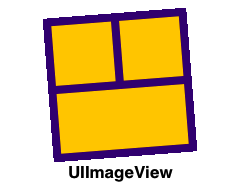
UIImageView with jagged outer edges but smooth inner edges

Essentially what happens when you add the 1 point transparent margin around the outer edges of the UIImageView is that the visible border becomes internal pixels and UIImageView interpolates them with the neighboring transparent pixels just as it does for the rest of the image, thus eliminating the need to anti-aliase the edges with the layer below it.  The resulting image (now with partially transparent edge pixels) can now be rendered directly over the layer beneath it.
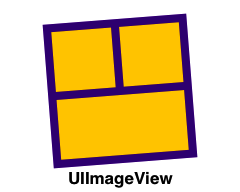
UIImageView with transparent edge- now all visible edges are smooth inner edges


How to render UIView as UIImage

You just create an image context, draw your view (or subset thereof) into the context, and get an image back.  This method lets you specify the exact frame (in the view’s coordinates) you want rendered.  Pass in view.bounds to render the entire view or pass a smaller rect to render just a subset (useful for splitting up views for animations).

+ (UIImage *)renderImageFromView:(UIView *)view withRect:(CGRect)frame
{
    // Create a new context of the desired size to render the image
    UIGraphicsBeginImageContextWithOptions(frame.size, YES, 0);
    CGContextRef context = UIGraphicsGetCurrentContext();

    // Translate it, to the desired position
    CGContextTranslateCTM(context, -frame.origin.x, -frame.origin.y);
    // Render the view as image
    [view.layer renderInContext:UIGraphicsGetCurrentContext()];
    // Fetch the image
    UIImage *renderedImage = UIGraphicsGetImageFromCurrentImageContext();
    // Cleanup
    UIGraphicsEndImageContext();
    return renderedImage;
}

How to add a transparent edge to UIImage

Again you just create an image context (this time slightly larger than your image), draw the original image into it (offset by a certain amount), then get the new larger image back.

+ (UIImage *)renderImageForAntialiasing:(UIImage *)image withInsets:(UIEdgeInsets)insets
{
    CGSize imageSizeWithBorder = CGSizeMake([image size].width + insets.left + insets.right, [image size].height + insets.top + insets.bottom);

    // Create a new context of the desired size to render the image
    UIGraphicsBeginImageContextWithOptions(imageSizeWithBorder, NO, 0);

    // The image starts off filled with clear pixels, so we don't need to explicitly fill them here	
    [image drawInRect:(CGRect){{insets.left, insets.top}, [image size]}];

    // Fetch the image   
    UIImage *renderedImage = UIGraphicsGetImageFromCurrentImageContext();

    UIGraphicsEndImageContext();

    return renderedImage;
}

Putting it all together

But of course why create 2 image contexts and render twice when we can do it in a single step?

+ (UIImage *)renderImageFromView:(UIView *)view withRect:(CGRect)frame transparentInsets:(UIEdgeInsets)insets
{
    CGSize imageSizeWithBorder = CGSizeMake(frame.size.width + insets.left + insets.right, frame.size.height + insets.top + insets.bottom);
    // Create a new context of the desired size to render the image
    UIGraphicsBeginImageContextWithOptions(imageSizeWithBorder, NO, 0);
    CGContextRef context = UIGraphicsGetCurrentContext();

    // Clip the context to the portion of the view we will draw
    CGContextClipToRect(context, (CGRect){{insets.left, insets.top}, frame.size});
    // Translate it, to the desired position
    CGContextTranslateCTM(context, -frame.origin.x + insets.left, -frame.origin.y + insets.top);

    // Render the view as image
    [view.layer renderInContext:UIGraphicsGetCurrentContext()];

    // Fetch the image   
    UIImage *renderedImage = UIGraphicsGetImageFromCurrentImageContext();

    // Cleanup
    UIGraphicsEndImageContext();

    return renderedImage;
}

Some things to remember

  1. Be sure to expand the size of your image view’s bounds to account for the transparent edges.  e.g. if the original image is 200 x 200 then resize to 202 x 202.  Otherwise (depending on its content mode) the image might shrink to fit its new size in its old bounds.
  2. This solution doesn’t work particularly well if the image is being scaled down.  You need to have 1 pixel of transparent edge at the scaled size, so if you are scaling by 0.25 you would need 4 points of transparent margin at the full image size.  But even then the results are often unsatisfactory.  Rasterization fixes it, but requires an additional expensive off-screen rendering pass.

Sample code

I created a simple sample project to demonstrate all this.  It has a regular UIView, a UIImageView copy with transparent edges, and a play/pause button to slowly rotate both views.  It’s on GitHub.

Note: the detail images were taken from the excellent xScope app by the Iconfactory.

CocoaConf Chicago wrap-up

I really enjoyed CocoaConf last weekend in Chicago,.  Dave Klein and his family really know how to put on a great conference: the sessions were informative, diverse, and entertaining, the venue was amenable and the hotel reasonably priced, the attendees were friendly, passionate, and eager to learn, and the whole atmosphere was one of community.  In addition to the technical learning, it was great to meet up with old developer friends and make new ones.

I debuted a new talk, “Enter The Matrix”, on using matrix transformations in drawing and animations (with obligatory, gratuitous references to the Matrix movies).  Based on the feedback, people seemed to enjoy it and find it helpful.  The talk includes a comprehensive sample app that contains 7 different demos.  My favorites are the Flip and Fold demos that involve rendering faux 3D animations in 2D courtesy of CATransform3D.  Slides can be downloaded here (latest version here), and you can follow the project on GitHub.

GameKit peer-to-peer connection displayName limited to 40 characters

The title says it all.  I had looked for this information on the internet but not found it.  This is the displayName that you specify in GKSession’s initWithSessionID:displayName:sessionMode: method, and that you retrieve with displayNameForPeer:

- (id)initWithSessionID:(NSString *)sessionID
            displayName:(NSString *)name
            sessionMode:(GKSessionMode)mode

- (NSString *)displayNameForPeer:(NSString *)peerID

You can pass a string of any length into initWithSessionID:displayName:sessionMode:, but it will be truncated to 40 characters when you retrieve it with displayNameForPeer:

CocoaConf Chicago 2012

I’m pleased to announce that I will be speaking at CocoaConf in Chicago in March.  My talk will be about using matrix transformations of UI elements with a focus on animation.  It was inspired by some recent client work that involved quite a bit of rotating, scaling, and translating in the animations.

Title: Enter the Matrix
Abstract: Matrix transformations can make your user interfaces come to life: translate, scale, and rotate.  Each on its own is relatively simple and straightforward.  Yet many developers are daunted when 2 or more operations need to be combined.  What if you need to rotate or zoom about an off-center (or even off-screen) point?  How do you combine multiple transformations into a single animation?  Learn everything you need to know to get started with complex matrix transformations in CoreGraphics and CoreAnimation.

UIView animations can interfere with touch events

Update: This issue went away as of Xcode 4.3.  I’ll leave the code up in GitHub just in case someone cares to look at animating via UIView vs. CABasicAnimation.

I created a simple expand/collapse button that would rotate an arrow image 180 degrees with each button press (as associated content was collapsed or expanded).  Somewhat similar to the ComboBox control with drop down content as seen on Windows.


That worked fine, but then I tried to get fancy and add in a 90 degree rotation on UIControlEventTouchDownInside (which would revert back on UIControlEventTouchUpOutside or complete on UIControlEventTouchUpInside).

Now all of a sudden the control would no longer receive the touch up inside notification if the user did a quick click (i.e. if the touch down animation was still running when the touch up event occurred).  Switching to a CALayer animation resolved the issue.  (I suppose I could also have tried adjusting the timing of the UIView animation, such as dispatching it via GCD or using performSelector:withObject:afterDelay.)

Anyway, I created an iPad sample app that has 2 versions of the control side-by-side to see the difference in the behavior and also has a switch to turn off the midway rotation on touch down.  The project can be found on GitHub here.

Just a black screen on the iPod touch


The other day I ran into this with a universal app. It ran fine on the iPad and on the iPhone, but produced the above when run on an iPod touch. The app would briefly show its splash screen, and then go black. My first thought was that the app had hung during initialization or it had crashed. The truth (as usual) was much simpler. As outlined in this StackOverflow post (don’t look at the answers, look at the author’s own comment on his question), the trouble is that we had specified a nib for both iPhone and iPad but not for iPod touch (this is more likely to happen if you’ve been manually messing around with your app’s plist).

You can fix it by editing the plist directly or by changing the settings under the Info tab of your target’s settings.  If your settings look like this:

Either change “Main nib file base name (iPhone)” to “Main nib file base name” (this will use the same nib for both iPhone and iPod touch) or create a new entry with “Main nib file base name” (this will allow you to use a different nib for iPhone and iPod touch, although I’ve yet to notice an app that has done so).

If you already have a valid entry for “Main nib file base name”, then you have another issue altogether…