Markdown CV

About a month ago I decided I ought to dust off my CV and get it updated. My CV is a Pages document, and it always seems like my CV is 90% formatting and 10% content, which drives me crazy. I’m a developer; I believe in interoperability, open file formats, and of course making my life easier. It seems like I ought to be able to write my CV in Markdown or something and host it online instead of printing it out or having to email it to people.

(Apropos of being a developer: instead of simply updating my CV, I spend more time figuring out a “solution” to theoretically make updating my CV in the future easier.)

I did some Googling and came across this project to publish your CV in Markdown via GitHub Pages. This would let me have my CV in Markdown and have version control. 🎉🎉🎉🤣

So I forked the repo, rewrote my CV in Markdown, updated it with what I’ve been doing for the past 5 years, and published it on GitHub Pages. Then I put a top-level menu link to it on this website.

I’m not satisfied with the current formatting, but that’s just a CSS file I can adjust (but probably never will). I’m also not satisfied with the content (I think I need to improve the descriptions of the roles I’ve played in various projects). But overall I’m happy with it¹ for the following reasons:

      • Updated content
      • Markdown format
      • Hosted online (with link from front page of my website)
      • Version control

¹Never conflate being satisfied with being happy

How to add an Obj-C bridging header to a Swift framework target in Xcode 10

You can’t, but here’s how you work around it. (Xcode 10.1 generates a compile error if you try to specify an Objective-C bridging header for a framework target.)

  1. Select the header file(s) you wish to bridge, and in the Target Membership section of the File Inspector, check to include it in your framework and then mark it as Public in the dropdown that appears.
  2. Include the header file(s) in the main header file of your framework.
#import <MySDK/MyHeaderFile.h>

Source: Stack Overflow (naturally!)

(This was the first time I’d ever seen the Public / Private / Project dropdown under Target Membership. I guess it’s only for headers, which you don’t typically manually include in a target.)

How to check whether a Core Data store needs migration

When using Core Data I typically rely on automatic lightweight migration to upgrade the persistent store to the latest model version. Today I needed to determine whether the store was migrated.

Creating my persistent store by calling addPersistentStoreWithType:configuration:URL:options:error: with the options to automatically kick off lightweight migration succeeds as long as a migration is possible, but doesn’t indicate when a migration has occurred.

I could just call addPersistentStoreWithType:configuration:URL:options:error: without the migration options, and if that throws an error, then I know I need to migrate. But it turns out there’s a more efficient way to check: simply call isConfiguration:compatibleWithStoreMetadata: on the object model before attempting to open the store.

code snippet:

let metadata = try NSPersistentStoreCoordinator.metadataForPersistentStore(ofType: NSSQLiteStoreType, at: storeURL, options: nil)

if !objectModel.isConfiguration(withName: nil, compatibleWithStoreMetadata: metadata) {
    needsMigration = true
}

Reading: Initiating the Migration Process

My First Twitter Bot

I love Twitter bots. My favorite used to be the @iaminigomontoya bot that would reply to anyone tweeting the word “inconceivable”. 🤣

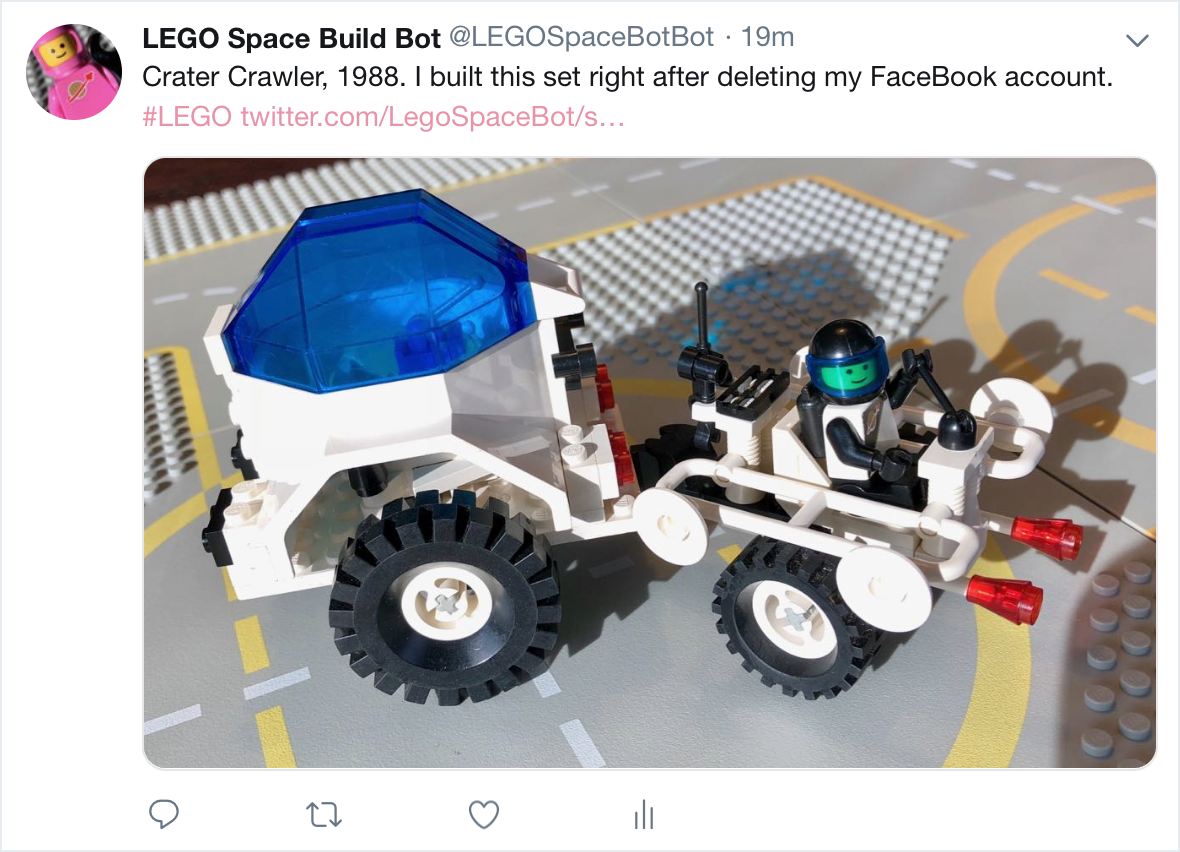
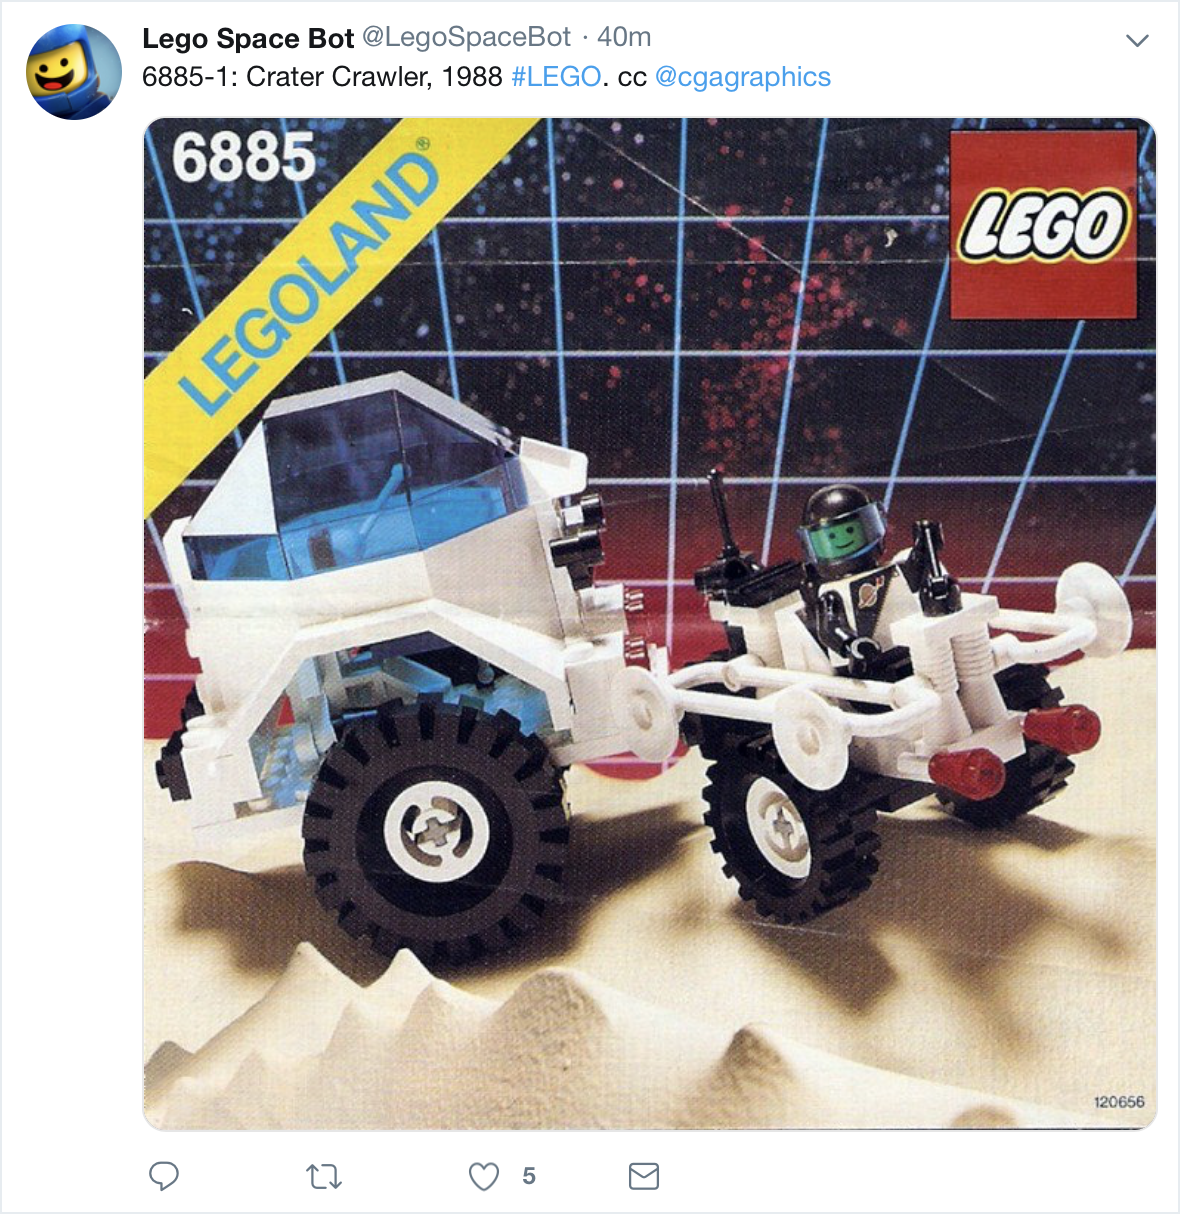
I’m also a fan of the @LegoSpaceBot (no real surprise there), which tweets pictures of old LEGO Space sets from the 70’s, 80’s, and 90’s.

These are for the most part exactly the sets that I have been building for my LEGO Space Project for the past two years. So it turns out that I have built and taken photos of most of the sets that @LegoSpaceBot tweets about. I thought it would be fun to make a bot that sort of trolled the @LegoSpaceBot by quote retweeting (almost) every post with my photo of the built set together with a short comment.

After a bit of Googling I decided that I would write and host my bot at Glitch.com. I needed to create a new Twitter account (@LEGOSpaceBotBot) and to sign up for the developer program. Glitch has multiple Twitter bot templates to choose from and lets you get started quickly by “remixing” one of their templates. I started with a template that tweeted random photos, but I also looked at templates that responded to other accounts. I would need both: to be able to search for tweets and to be able to post images.

JavaScript is … interesting. After working in Swift for the past year and a half, it’s quite the change. JS developers: respect.

The basic bot idea was to look at tweets from @LegoSpaceBot, find those which mention specific sets (some posts are of catalog pages), parse out the set number, and check to see whether I have a photo of that set. If it finds a match, then quote retweet that post with the photo and a random message. If no match is found then quote retweet with a different random message.

To avoid having to do too much work, I want it to keep track of the most recent tweet that it has successfully processed. This is written to a simple text file. I also wanted to make sure it only responds to the most recent tweet even if it has been offline for a period of time. (I wanted to make sure it didn’t accidentally respond to @LegoSpaceBot’s entire backlog of 8k+ tweets…)

I started out with an array of 8 phrases that would be chosen randomly to accompany each post. After the same phrase was randomly chosen for the second and third posts, I realized that I needed something a bit more advanced than just simply random. Fortunately, the author of the @LegoSpaceBot already solved this problem and has a good discussion of the issue here. The basic gist is to split the array into two halves and shuffle through one half before shuffling through the other half. That guarantees a minimum distance of N/2 between any repeats. So for my array of 8 phrases, any given phrase would be at least 4 tweets apart. (Obviously I need more phrases.) I adapted my randomizing method from the code here. This solution relies on being able to seed the randomizer, which to my surprise JavaScript.Math does not handle by default! Fortunately there’s an answer for that too and you can add seed functionality by including seedrandom.js from here.

En fin, I hereby present the LEGO Space Build Bot.

HTTP Cache, where have you been all my life?

Yesterday I learned about the built-in support for HTTP cache in URLSession. How had I missed out on this? There are so many frameworks and libs out there that implement image caching systems, but this great functionality is already built into Foundation.

This post by Alexander Grebenyuk does a good job of laying it all out.

In my current project I need this to cache profile images.

Most of what I had to do to get HTTP cache working was to set the cache policy for my image requests. (Cache policy can be configured per session or per individual request.)

request.cachePolicy = .returnCacheDataElseLoad

(Note: This policy ignores validation in favor of always returning the cached value. We have a separate mechanism to signal profile image changes.)

Pixel Art Map Tiles in SpriteKit

I decided to use SKTileMapNode to render the mountain that must be climbed. There will be tiles for stone, sky, ice, snow, flowers, etc.

Map Tiles
Tile Map

As I mentioned in my previous post, Mountain Dash renders 1x pixel art at 2x (which means 4 × 4 or 9 × 9 pixels on screen for each pixel in the original assets). I chose to do tiles at 16 × 16 pixels, so I need each tile to render at 32 × 32 points. It is entirely possible to do this using the Tile Set Editor and Tile Map Editor in Xcode, but I ran into two problems:

  1. Every time you assign an image in the Tile Set Editor, it defaults to the image’s actual size (16 × 16) and must be manually changed to the desired size (32 × 32)
  2. Occasionally Xcode for whatever reason decides to blur the tiles when scaling them up. The only solution with the Tile Set Editor is to remove and then re-add all the images (and manually retype all the sizes yet again).
Blurry Tiles
Blurry Tiles

I already knew that I could fix the blur in code by setting filteringMode = .nearest for each texture, but while the Tile Set Editor lets you define textures, it doesn’t let you set filteringMode.

All of the above was way too much hassle and as it turns out unnecessary. Instead of scaling up my maps and my sprite by 2x, I could use all my assets at their native sizes and just use an SKCameraNode and set cameraNode.scale = 0.5 to scale in 2x. I need to use SKCameraNode anyway to scroll my map (you just change the position of the camera), so this was perfect. Also it’s helpful for debugging to use the camera’s scale to either zoom in (see pixel art details) or zoom out (see more of the map on screen at once). (The above screenshot was taken at 4x or scale = 0.25.) I may even add a pinch-to-zoom gesture to allow the player to do the same. The scale on SKCameraNode was unintuitive at first because it is the inverse of what I expected; I’m used to writing scale = 2 to double a view’s size.

Even with everything at 1x, I’ve still had the Tile Set Editor barf on me once and give me blurry tiles, so I’ve decided to permanently fix this by looping through all the textures in the tile set and setting the filteringMode. I wonder if there’s a better way of handling this…

let tileSet = map.tileSet
for tileGroup in tileSet.tileGroups {
    for tileRule in tileGroup.rules {
        for tileDefinition in tileRule.tileDefinitions {
            for texture in tileDefinition.textures {
                texture.filteringMode = .nearest
            }
        }
    }
}

Pixel Art Sprites in SpriteKit

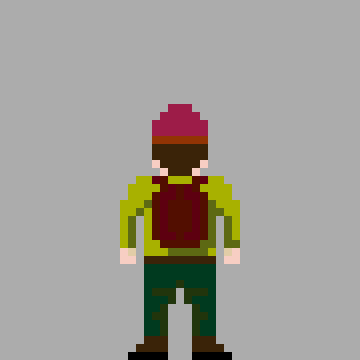
For Mountain Dash I decided to adopt a pixel art aesthetic, primarily as a way to keep the design of the graphics simple, but this choice has lead to its own challenges. I decided I would use a 16 x 32 pixel sprite but that I would render it at 32 x 64 points. Initially I was exporting my assets at 64 x 128 pixels for @2x and 96 x 192 pixels for @3x, but I figured that this was wasteful and there had to be a better way. So I decided to use only a 16 x 32 pixel image at 1x and scale the sprite to 32 x 64 points.

The following is what I got on my first attempt:

Blurry Sprite

The sprite is blurry because of how it is scaled up. Fortunately, this is a simple 1-liner to fix. All you need to do is set filteringMode on your textures (all of them) to .nearest.

let firstTexture = climberAtlas.textureNamed("climber_still")
firstTexture.filteringMode = .nearest
climber = SKSpriteNode(texture: firstTexture)

…and voilà the sprite is rendered pixel perfect as desired!

Sharp Sprite

Mountain Dash – a game

Mountain Dash App Icon

In January I decided to try and write my first iOS game. Inspired by our new home in Switzerland and the movie North Face, I decided that it would be a mountain climbing game. To keep things as simple as possible, it will be written in Swift using SpriteKit. Graphics will be done in a pixel art style. My son will be helping me with art and game play ideas.

Mountain Dash edelweiss

Why a game? Because I’ve always loved (retro) games, and I want to challenge myself with something new and learn frameworks and tools that I’ve never had occasion to use. Initially I thought I would open source the game (indeed it was a public repo on GitHub until just recently), but I finally decided against that for now. Mostly because even if the game is destined to never earn a penny, it would still suck if someone copied it, cloned it, and submitted it to the App Store before me. Maybe I’ll consider open-sourcing it after the game is finished. Regardless, I hope to write about little development challenges I run into along the way. Indeed I am already behind in writing about the first of those.

I’ve also invited my friend and colleague, Ethan Mateja, to join me in working on the game. I enjoy working with him and I hope that between the two of us we can keep things moving forward and not let the project languish. To be honest I didn’t touch the game during the entire month of February. But it’s March now and I’m pushing forward again.

Device orientation vs interface orientation

Just today I got bit by confusing device orientation and interface orientation. I really should know better. Device orientation is of course the orientation that the device is currently being held in, while interface orientation is the orientation of the running app’s user interface.

What I was trying to do was to hide the status bar while in landscape mode and show it in portrait mode for an iPhone app that operates in the 3 principal orientations: portrait, landscape left, and landscape right.

To achieve that I was using code like this:

#pragma mark - Status Bar

- (BOOL)prefersStatusBarHidden
{
    return (UIDeviceOrientationIsLandscape([[UIDevice currentDevice] orientation]));
}

#pragma mark - Orientation

- (void)willAnimateRotationToInterfaceOrientation:(UIInterfaceOrientation)toInterfaceOrientation duration:(NSTimeInterval)duration
{
    [super willAnimateRotationToInterfaceOrientation:toInterfaceOrientation duration:duration];
    
    [self setNeedsStatusBarAppearanceUpdate];
}

This works fine at first blush, especially in the simulator, but not so well in practice. First off, the app doesn’t even support all 4 possible interface orientations (the fourth being upside down portrait), so what happens when the phone is held upside down? Well the interface orientation doesn’t change from its previous orientation (most likely landscape) but the device orientation is not landscape and so the status bar appears. Bug.

But even worse, there are additional device orientations (namely face up and face down) that are neither portrait nor landscape and have no matching interface orientation. If the phone was last in landscape interface orientation and then gets laid flat on the desktop, the device orientation is no longer landscape (it is flat), and so the status bar appears. Bug again.

Just for the record, here’s the definition of UIDeviceOrientation:

typedef NS_ENUM(NSInteger, UIDeviceOrientation) {
    UIDeviceOrientationUnknown,
    UIDeviceOrientationPortrait,            // Device oriented vertically, home button on the bottom
    UIDeviceOrientationPortraitUpsideDown,  // Device oriented vertically, home button on the top
    UIDeviceOrientationLandscapeLeft,       // Device oriented horizontally, home button on the right
    UIDeviceOrientationLandscapeRight,      // Device oriented horizontally, home button on the left
    UIDeviceOrientationFaceUp,              // Device oriented flat, face up
    UIDeviceOrientationFaceDown             // Device oriented flat, face down
};

And here’s the definition for UIInterfaceOrientation:

typedef NS_ENUM(NSInteger, UIInterfaceOrientation) {
    UIInterfaceOrientationPortrait           = UIDeviceOrientationPortrait,
    UIInterfaceOrientationPortraitUpsideDown = UIDeviceOrientationPortraitUpsideDown,
    UIInterfaceOrientationLandscapeLeft      = UIDeviceOrientationLandscapeRight,
    UIInterfaceOrientationLandscapeRight     = UIDeviceOrientationLandscapeLeft
};

It’s interesting that UIInterfaceOrientation is defined in terms of UIDeviceOrientation.

TL;DR;

So what I should have been doing was this:

#pragma mark - Status Bar

- (BOOL)prefersStatusBarHidden
{
    return (UIInterfaceOrientationIsLandscape([[UIApplication sharedApplication] statusBarOrientation]));
}

This works as expected when the device is upside down or flat.
CocoaConf San Jose wrap-up

This past weekend I had the pleasure of attending and speaking at CocoaConf San Jose. This was the 6th CocoaConf event I’ve attended, and I believe it was one of the best. Highlights for me included:

  • Matt Drance‘s opening keynote where he discussed the importance of people in our work: our customers (users), our co-workers, and ourselves. This is something that we as engineers can often lose sight of.
  • Jaimee Newberry‘s session on brainstorming. Jaimee is a fantastic speaker and always fun to watch, and there was plenty of info on how to manage and get the most out of brainstorming sessions, which I’d like to try on my next project.
  • Ben Lachman‘s session on prototyping, which covered a variety of tools and workflows and included a demo of the yet to be released Briefs 2 (which I plan on buying as soon as it is available. Seriously, just take my money already!).
  • Marcus Zarra‘s session on the MVC-N design pattern, which contained a strong admonition against relying on 3rd party code (especially networking code). This is going to change how I approach the next client project I manage. This talk alone made attending the conference worthwhile.
  • Daniel Pasco‘s session on the long road and various pitfalls encountered in transforming his company, Black Pixel, from a client-work company into a product company (Black Pixel makes the excellent Kaleidoscope 2 — you should buy it). Valuable lessons for anyone seeking to go indie.

I presented 2 talks of my own. Thursday evening I delivered a talk on UICollectionView. This was the 4th (and probably final) time I delivered this talk over the past 6 months. The sample app (which contains 5 different layouts and multiple examples of advanced customizations) is available on GitHub here, while the slides can be downloaded here.

photo pinch

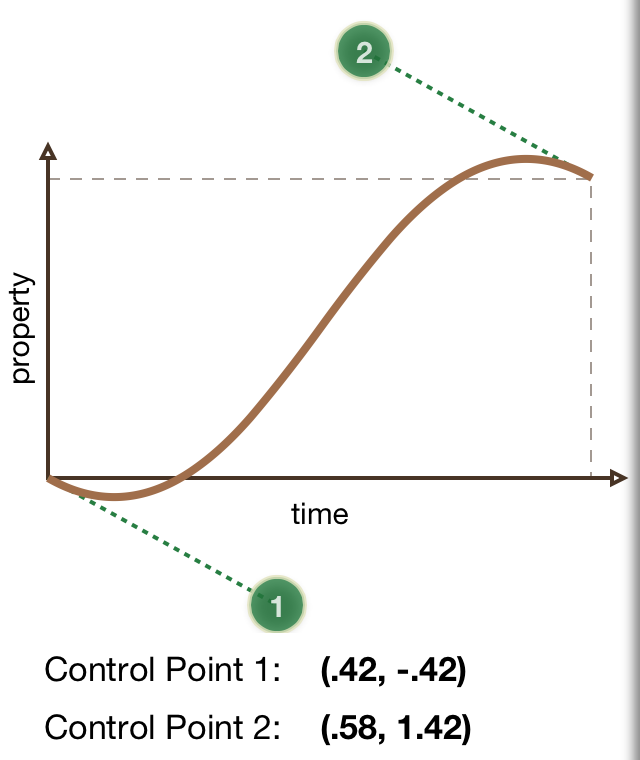
Saturday morning I presented “Animation: From 0 to Awesome in 90 Minutes”, which is an animation talk that begins with some design principles of animation (drawn from Phil Letourneau’s portion of our joint animation session at Renaissance), proceeds to discuss UIKit and Core Animation (and the limitations of UIKit), then takes a close-up look at flipping and folding animations, and wraps up with some general graphical performance tips. This talk is sort of an evolution of both the Renaissance talk and my Enter The Matrix: Reloaded sessions from 2012, and yet is also its own thing. I debuted it last month at CocoaConf DC and this was its second iteration. The sample app is available on GitHub here, while the slides are available for download here. My favorite portion of the app is the touch-enabled timing curve widget that lets you create custom cubic bezier curves by dragging 2 control points (and shows you their values). I think that was also one of the big takeaways from the talk: that you can have an animation overshoot its endpoint and then snap back by simply applying the right timing curve to a basic animation with no need for multiple or keyframe animations.

Timing curve

This wraps up the CocoaConf Spring Tour and my own 3 conference “Spring Tour” as well. I plan to take the summer off from speaking and pick it up again in the Fall.